Issue Credential
After the "Save Schema and Cred Def" how-to, an issuer is ready to do this workflow. When this how-to is finished, a logical next step might be "Negotiate Proof"
In case of troubles running the how-to, please read the trouble shooting section.
Prerequisites
Setup your workstation with an indy development virtual machine (VM). See prerequisites.
Steps
Step 1
In your normal workstation operating system (not the VM), open a text editor of your
choice and paste the template code of one of the available in the list bellow into
a new file and saved it as issue_credential.EXT, replacing EXT with the proper file
extension (e.g for python: issue_credential.py, for nodejs: issue_credential.js, and so on).
We will be modifying this code in later steps.
[ Python template | Java template | Rust template]
This is a very simple app framework into which you’ll plug the code you’ll be writing.
Step 2
This how-to builds on the work in "Save Schema and Cred Def". Rather than duplicate our explanation of those steps here, we will simply copy that code as our starting point.
Copy the contents of the correspondent step2 file below into your issue_credential file
instead of the Step 2 code goes here placeholder comment, and save it.
[ Python step2 | Java step2 | Rust step2]
Step 3
So far, we have created an identity that can be used to issue credentials. We need another one, now, that can be used to hold credentials once they’re issued.
Copy the contents of the correspondent step3 file below into your issue_credential
file instead of the Step 3 code goes here placeholder comment.
[ Python step3 | Java step3 | Rust step3]
Notice that this identity creates something called a link secret (formerly called a master secret; this older term is now deprecated). A link secret is a special piece of data that’s inserted into a credential, in blinded form, on issuance; it is used to prove that the credential in question belongs to a particular holder and not to someone else. Because Alice’s credentials contain her link secret, only she can use them.
Step 4
At this point, the issuer and the person who receives the credential (called the holder) engage in an interactive protocol that results in issuance.
First, the issuer offers a credential. This step is optional; we include it for completeness. Next, the holder requests the credential, supplying the blinded link secret that will bind it to them. Finally, the issuer generates the credential and gives it to the holder.
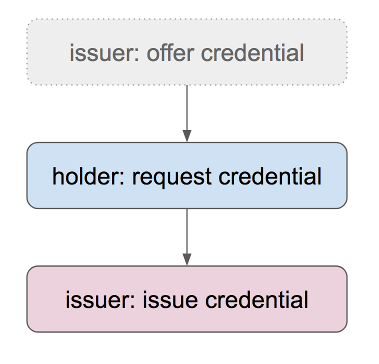
These three steps embody a negotiation pattern that is used in many indy interactions (e.g., in proving). Either party can begin; the other party acknowledges and accepts–or makes a counter proposal. In the case of a counter proposal, a new negotiation cycle begins; in the simpler case, the negotiation is concluded successfully. Negotiation could be used during credential issuance to negotiate a change to a credential (e.g., to correct a typo or to ask an issuer to include or omit a piece of data that they didn’t initially propose); however, we don’t cover that advanced workflow here.
One other note: the sample code in this step uses the word “claim” in places where you might expect “credential.” These used to be synonyms, but usage has evolved in the W3C since the Indy SDK was built. “Credential” is the newer word, and function and parameter names that refer to “claims” are now deprecated. Eventually, all usage will show “credential.”
Copy the contents of step4 file below into your issue_credential file instead of
the Step 4 code goes here placeholder comment and save it.
[ Python step4 | Java step4 | Rust step4]
Step 5
Run the completed demo and observe the whole sequence.
More experiments
You might try the "Negotiate a Proof" how-to, which can be done in only one step once you complete this one.